[MongoDB] User 생성하기
createUser — MongoDB Manual
Docs Home → MongoDB ManualcreateUserCreates a new user on the database where you run the command. The createUser command returns a duplicate user error if the user exists. The createUser command uses the following syntax:Starting in version 4.2 of the mo
docs.mongodb.com
1. MongoDB compass 에서 DB 접속
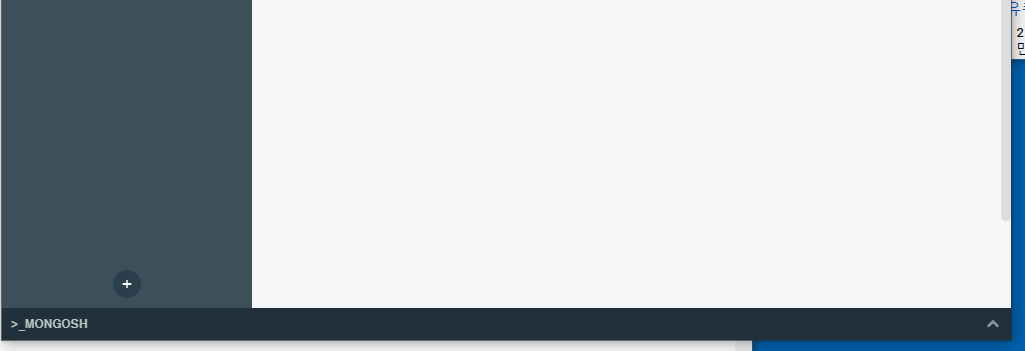
2. 아래 >_MONGOSH 에서
>> use admin
입력

>>show users
입력
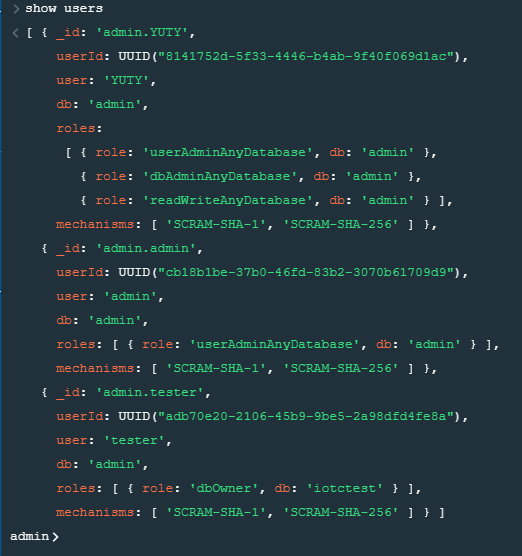
user가 등록되어 있을 때 화면
모든 테스트를 해보기 전 (Blank 상태 라고 할까?) 상태로 돌리기 어려워서 완료된 형태로 보여줬다.
본 포스팅 내용은 나중에 처음 부터 셋업할 기회가 다시 생겼을 때 참고하려고 작성하는 목적이기 때문에
그냥 과정만 간략하게 소개하려 한다.
3. 사용자 등록하기
3-1. roles 에 대한 기본 사전에 등록되어 있는 내용들
먼저 User and Roles 에 대한 상세한 내용은 아래 참조
Manage Users and Roles — MongoDB Manual
Manage Users and Roles — MongoDB Manual
Docs Home → MongoDB ManualManage Users and RolesThis tutorial provides examples for user and role management under the MongoDB's authorization model. Create a User describes how to add a new user to MongoDB.If you have enabled access control for your dep
docs.mongodb.com
userAdmin : indexing, gathering, statistics 등 기능 수행 / user 와 role에 대한 management 제외
dbAdmin : 해당 DB에 대한 user 의 role 를 생성(변경) 기능 수행, userAdmin 권한을 받았을 경우 superuser 생성 가능
dbOwner : readWrite + dbAdmin + userAdmin 기능 (거의 모든 기능)
readWrite : 모든 데이터베이스의 읽기 / 쓰기 원한 (System Collection 제외)
read : 모든 데이터베이터의 읽기 권한 (System Collection 제외)
clusterAdmin
clusterManager
clusterMonitor
hostManager
-- All Database Roles --
readAnyDatabase
readWriteAnyDatabase
userAdminAnyDatabase
dbAdminAnyDatabase
더 자세한 내용은 아래 정리된 블로그 참조.
[MongoDB] [Study-12] Authentication & Role 정리 :: Louis.Kim 의 제 3막 (tistory.com)
[MongoDB] [Study-12] Authentication & Role 정리
MongoDB 보안 MongoDB 는 보안 관점으로 크게 5가지로 정리를 할 수 있으며, 해당 문서에서는 인증과 권한, 테스트한 내역만 작성 인증(Authentication) 권한(Authorization) 암호화(Encryption) - TDE - Mongo DB..
hyunki1019.tistory.com
db.createUser(
    {
        user : "tester119",
        pwd : "12345678",
        roles : [ { role : "readWriteAnyDatabase", db : "admin" } ,
		{ role : "userAdminAnyDatabase", db : "admin" } ,
		{ role : "dbAdminAnyDatabase", db : "admin" }
	]
    }
)
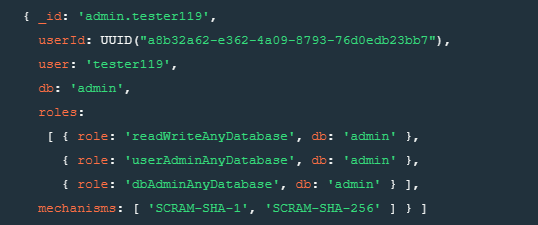
4. 추가된 사용자 확인하기
>>show users
입력으로 확인
5. mongod.cfg 내용 내용 변경하기
MongoDB 경로>> mongod.cfg 파일을 메모장으로 열어서
#security: 의 내용을 아래 내용처럼 #을 지우고 (주석처리된 삭제)
엔터 후 authorization: enabled 라고 입력해줌.
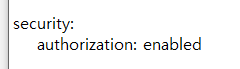
저장하고 메모장 닫음.
6. 윈도우 서비스 재시작으로 서버 다시 시작하기

윈도우 10 아래 검색창에 " 서비스 " 라고 입력하면
가장 상위에 뜨는 앱 실행!

MongoDB Server 를 선택 후 마우스 오른쪽 클릭 [다시 시작] 을 누름.
보통 몇 초 후에 다시 실행됨을 확인
-> 여기서 다시 시작되지 않으면 mongod.cfg 파일을 수정하다가 오타가 나거나 뭔가 잘못 만졌을 확률이 크므로 mongod.cfg 내용을 다시 검토해 봐야 함...
7. Compass 실행으로 DB 접속되는지 확인하기

New Connection 에서
오른쪽에 [Fill in connection fields individually] 버튼을 누름.
사용자 인증을 통해야 하므로 [Authentication] 을 Username / Password 를 선택해줌.
Username , Password 를 각각 입력해줌.

바로 오른쪽 밑에 [Connect] 를 눌러줘도 되지만
상단에 Paste connection string 으로 연결 문자열 한번 확인 해줌.
8. connection String 확인하기 (옵션)
mongodb://tester119:*****@localhost:27017/?authSource=admin&readPreference=primary&appname=MongoDB%20Compass&ssl=false
connection String 을 보면 위처럼 나와있다.
향후 응용프로그램을 작성할 때 위 connection String 을 활용하면 셋팅 인스턴스 프로퍼티값 셋팅에 대한 코드를 줄일 수 있다.
또한 나중에 응용프로그램 코딩할 때 appname=MongoDB%20Compass& 는 삭제해도 되고
uuidRepresentation=Standard
는 추가해야 GetDatabaseNames(), GetCollectionNames() , get_item() 등 메서드를 Exception 없이 원활하게 사용할 수 있는 것이 확인되었다....
Connection String URI Format — MongoDB Manual
Connection String URI Format — MongoDB Manual
Docs Home → MongoDB ManualThis document describes the URI formats for defining connections between applications and MongoDB instances in the official MongoDB Drivers. For a list of drivers and links to driver documentation, see Drivers.You can specify th
docs.mongodb.com
9. 연결 후 Database 생성 / Collection 생성 / 데이터 생성 / 삭제 테스트
잘 되는 것을 확인.
추가 업데이트 내용
db.createUser(
    {
        user : "root123",
        pwd : "12345678",
        roles : [ { role : "root", db : "admin" } ]
    }
)
role : "root" 를 이용하면
db.serverStatus().connections
와 같은 서버 root 권한으로 실행하는 명령이들이 실행됨.
포스팅 후 결론
MongoDB 에 대한 어플리케이션 (간이 서버 구축, 클라이언트 응용 프로그램 테스트) 를 준비하고 진행하는 과정에서 필요한 내용에 대한 절차를 작성해 보았다.
이에 따라 여러가지 인터넷 검색을 하여 필요한 정보에 대한 테스트를 진행하였고, 방대한 정보 중에 딱 필요한 정보에 대한 셋업 절차를 정리하였다.
물론 과정 속에 더 많은 옵션과 더 이해해야 하는 부분도 많지만.. 그 부분은 향후 필요에 따라 더 깊은 내용에 대한 이해도가 높이졌을 때 포스팅을 할 계획이다.